How to Create a WoW Addon
World of Warcraft is a very popular MMO, and addons for the game are extremely popular as they can really add to gameplay and tactics to customise the experience. This tutorial is going to build on a basic knowledge of Lua to create some basic World of Warcraft addons.
Let's get going!
If you're familiar with addons for the game, they usually come in a folder which you can simply paste inside the /Interface/AddOns directory inside your game folder (which is usually C:/Program Files (x86)/World of Warcraft) - if the versioning and everything is fine, the addon should work just great. If you open up the folder of any game addon, even the default ones which Blizzard provides, you should see that every addon follows a set of rules - the most basic two which we must abide to are:
- Each addon must have its own directory inside the
/Interface/AddOnsfolder. - Inside each addon folder there must be a
.tocfile which has the same name as the addon folder and contains information about the addon.
So if we wanted to create our own basic addon to just output some text to the screen, the first step we would take is to create a folder with the name of the addon, and create a .toc (Table Of Contents) file inside of this folder which has the same name as it. So let's do it - create a folder called "HelloWorld" in /Interface/AddOns and create a file called "HelloWorld.toc" inside this.
The TOC file is essentially where the game is going to start looking at our addon, so it has to be formatted in a particular way. A number of directives can (and should) be written at the start of the file which list information such as the version of the game your addon is built for, the title of your addon, the version of the addon, the author, any notes, etc. These can be listed through the prefix of two hash symbols (##) followed by a space, the name of the property you want to define, a colon, and then the value you want to set the property to. Apart from the version of the game your addon is created for, which is defined by the ## Interface: XXXX directive (in which XXXX is the interface version), most other common property names are reasonably intuitive and guessable. A basic .toc file, HelloWorld.toc in our case, should look something like this:
1 2 3 4 | |
Note that this file, along with all the others we will be creating in this tutorial, can be created/modified with any text editor of your choosing -- whether that be Notepad, Sublime Text, or whatever you like using.
After our directives, any lines of the file which aren't prefixed with ## are treated as files which will be loaded/executed when the addon is loaded (i.e. when a character has entered the world) - these are loaded in the order they are specified. In our case we just want to execute some basic Lua, so let's create a .lua file (in this example - main.lua) which will contain our script and then tell the TOC about it by listing the filename at the bottom of HelloWorld.toc:
1
| |
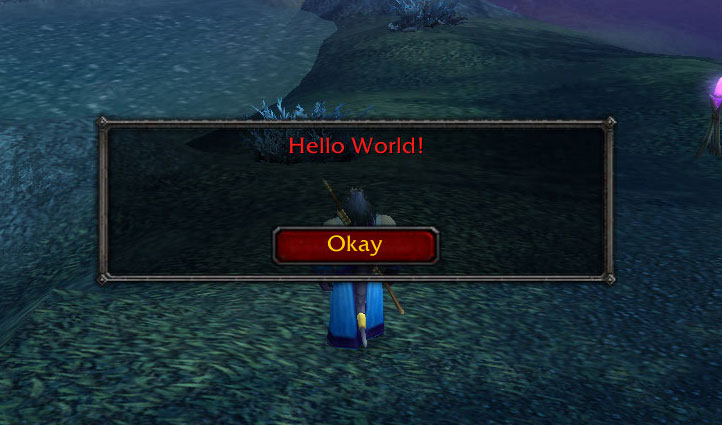
So now the addon setup is essentially complete, we just need to write the script which actually achieves the functionality we want! When writing Lua scripts for World of Warcraft, a bunch of custom functions and tables and things are made available to you to do different things to/with the game. In this case, where we just want to output text to the screen, we can either use the print function to output some text in the chat window, or the message function to create a pop-up box with some text. It's worth noting that the message function is now depreciated (which means it will be phased out soon), so it should really be avoided where possible (and may not work in your current game version - in which case use print for this example), however it's a good way of getting some fast visual results at this early stage. So if we put the following line into main.lua and then open up the game and log in, checking the "Addons" window before character selection to see if the game has recognised the addon (if it hasn't, there is something wrong with the folder/TOC setup), we should see a pop-up box appear on the screen when a character is selected:
1
| |
Stepping things up
Ok, so we created an addon which outputs some text. It's kind of cool from a development perspective, but it's essentially useless. The aim of the next addon we're going to create is to congratulate the user when they level up a character -- it's still not very useful, but it's a little more complex and it paves the way for "proper" addon development with some pretty simple expansion.
So to check when a character has levelled up we need to respond to an event the game fires, and to know about events we need to make use of these things called frames. Frames, in the context of World of Warcraft addon development, are essentially structures (if you're all that familiar with Lua, they are custom tables) which allow for the detection of certain game events and the creation of windows and a bunch of other cool stuff.
So the first thing we want to do in our new script is create a frame. We should make this a local variable just to make sure we aren't causing any naming conflicts or anything in a wider scope, and we can assign this new variable to a new frame by using the CreateFrame function and passing it the "Frame" value, so the first line of our main.lua file should be:
1
| |
In this case I decided to name the frame "Congrats_EventFrame" as it seems unlikely to cause any naming conflicts and it is reasonably descriptive of what this frame is for. From here we can do things with the frame using the colon (:) operator (like any other table in Lua if you're familiar). The first thing we want to do with our frame is tell it to watch out for the event of a character levelling up, this is expressed through the PLAYER_LEVEL_UP event in the WoW Addon API, and as such we can pass this value to Congrats_EventFrame:RegisterEvent to tell our frame to watch for it:
1
| |
Now all we need to do is tell our frame what to do when it catches the PLAYER_LEVEL_UP event. We can do this by using the Congrats_EventFrame:SetScript function, which as the name suggests sets scripts for certain situations, and in this case we want to set a script for when an event fires, hence we pass it the "OnEvent" value followed by the function we want it to execute when an event is caught by our frame. The function that deals with "OnEvent" is passed different parameters depending on the event which is being fired, however the first two parameters should always be assigned to self and event, and then we can use ... to handle any more parameters which are passed. So our basic event handling code at the moment should look something like this:
1 2 3 4 | |
If we were handling multiple events with this frame in a more complicated script, we'd want to check if the event parameter was equal to a certain event and then handle that event from there, but in this case we only need to worry about one event and so such checking isn't necessary (we can just jump in as the only event it can be is the PLAYER_LEVEL_UP event).
The first thing we want to do to handle the event is to make use of those extra parameters I said might be passed in to our function -- in the case of PLAYER_LEVEL_UP, there are nine extra arguments passed: the new character level, HP gained, MP gained, talent points gained, strength gained, agility gained, stamina gained, intellect gained, and spirit gained. We can set these variables, which we will call "arg1" to "arg9", by assigning a variable list to the extra parameters:
1 2 3 4 | |
Now we have all the data available to us and we have a portion of code which will only be executed once the player has levelled up, we just need to make use of the print function to concatenate and then output some values! One nice touch might be to add the player's name which can be retrieved by passing the UnitName function the "Player" value -- it's worth noting that a similar function, UnitLevel, is available to get the level of a specified unit, however we don't need to use it in our script as the event argument provides an easier (and more accurate) representation of the player's level. My final implementation of the script is below:
1 2 3 4 5 6 7 | |
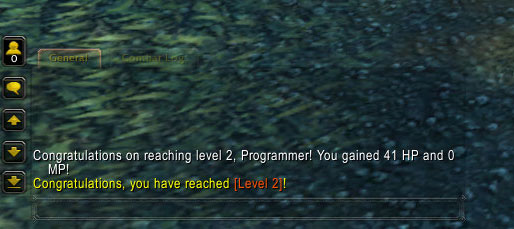
Brilliant! It works! And that's where we will finish this basic tutorial. Hopefully you've learned something, and of course there is a lot more to WoW addon development - you can handle more events, you can make use of saved variables between game sessions, you can create proper UI windows - the list goes on. Hopefully with the strong foundations this tutorial should have given you it shouldn't be too difficult for you to continue learning about new features and functions and different things and continue on your path to making awesome WoW addons.